Category: Two Way Radio

Blog of Two Way Radios

  • Is Digital Radios HYT G36 worth unpacking?

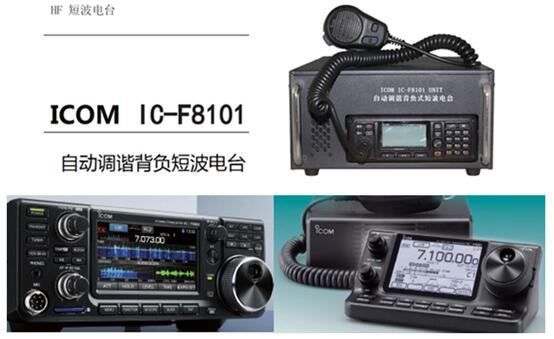
    Once upon a time, the Hytera TD370 was my dream walkie talkie. Unfortunately, the price of this machine has always been very high. I believe that the price not only makes me, but also makes many HAM Radio Fans with limited budgets flinch. However, Hytera has not given up on the entry-level DMR digital analog integrated walkie talkie. Recently, it launched a Hytera G36 digital analog integrated walkie talkie. Of course, you can’t miss this affordable digital walkie talkie.

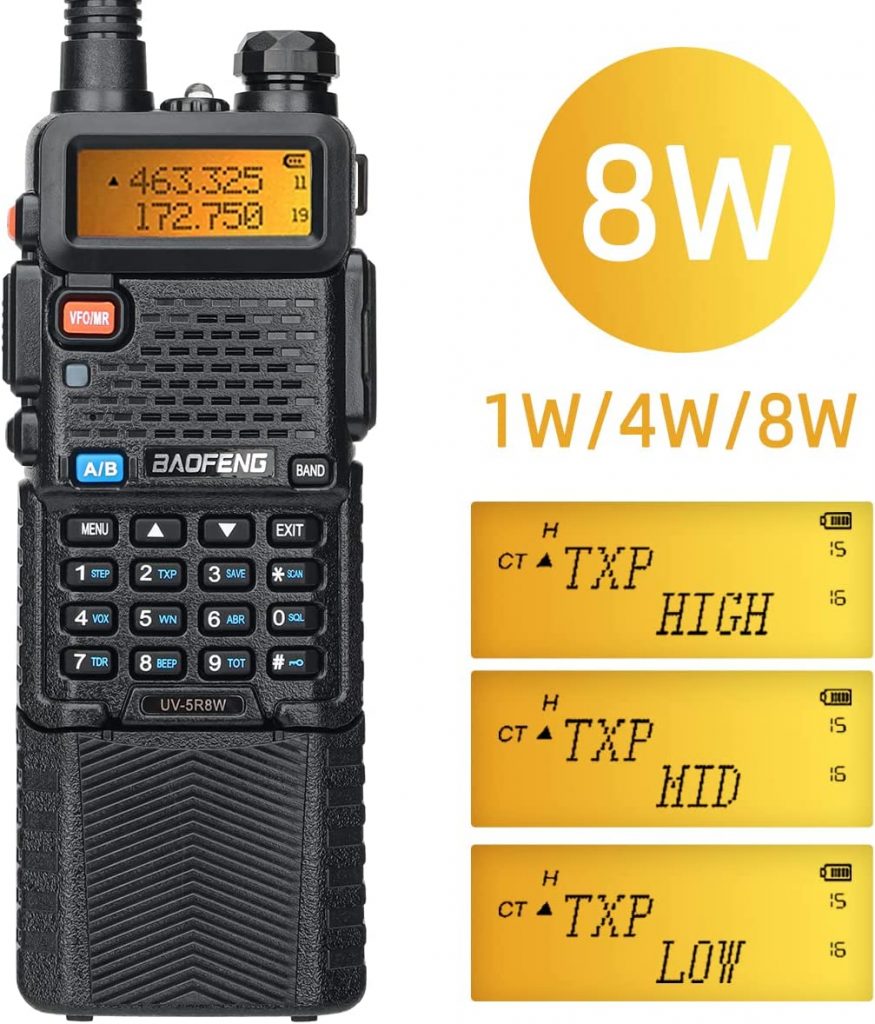
    Like the HYT TD370, this Hytera G36 digital analog integrated walkie talkie is a single U segment device with a maximum transmission power of about 3W. It can set two transmission powers, high power and low power. The battery capacity is 2200mAh. It supports Type-C port charging. At the same time, it also has a 0.9 inch OLED display screen, which can check the working status of the machine.

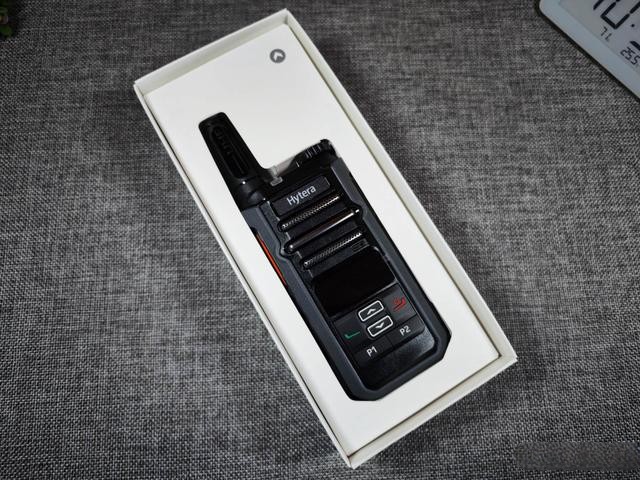
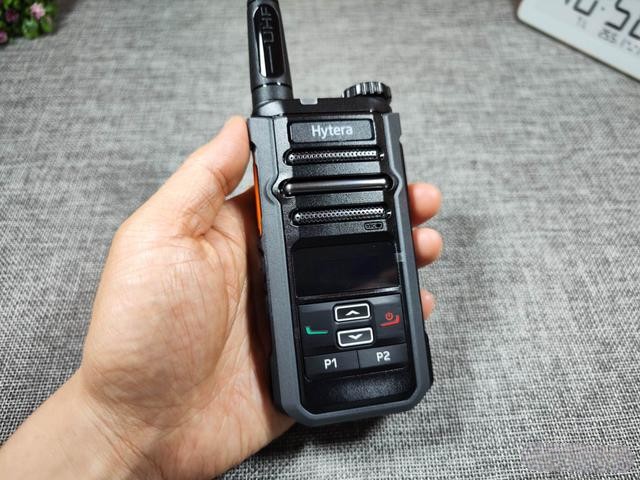
    At first glance, when I saw this walkie talkie, I felt it was still very compact. The front speakers of the machine accounted for a large proportion, and the actual measurement of the speaker’s external playback effect was very good. The sound was loud but not explosive, and the bass was thick and powerful.

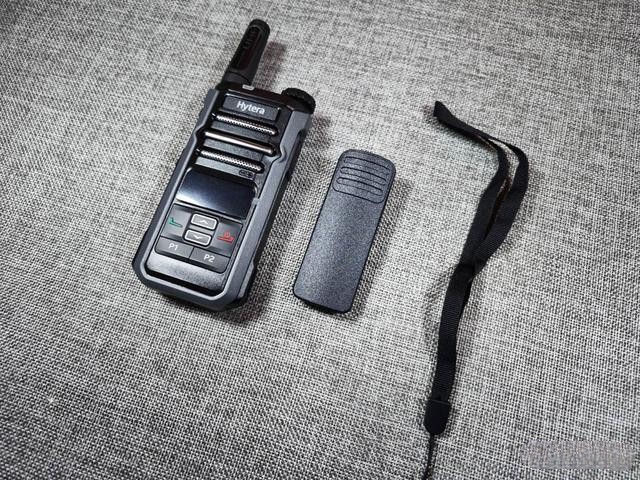
    In addition to the main unit, there is also a back clip and hanging rope inside the packaging, which is easy to carry with you after installation. In addition, a charging cable is also included when purchasing, making it convenient to charge and write frequency to the machine. The advantage of this machine is that it is easy to write frequency, and you can set the frequency for the walkie talkie using your phone’s data cable, without the need to purchase a dedicated frequency writing cable.

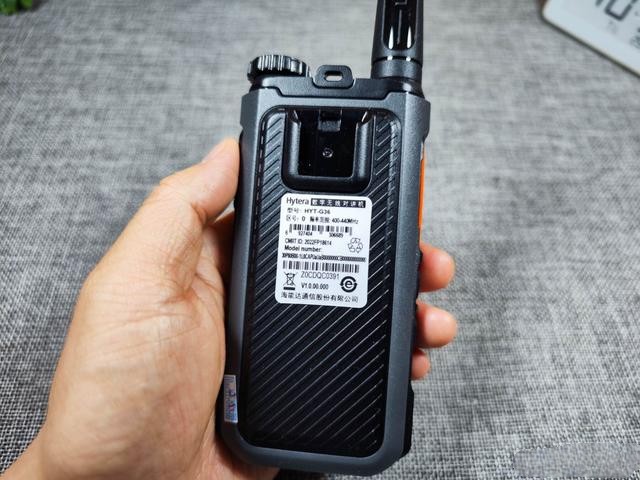
    The radio approval code for this Hytera G36 is 2022FP18614. Everyone can verify the machine and apply for a radio license, and legally use radio equipment. The body adopts a one-piece design, and the battery is not detachable. However, the installation of the back clip is detachable and easy to disassemble. Unlike some walkie talkies, the difficulty of removing the back clip is extremely high, which is very wasteful.

    The overall feel of the Hytera G36 is still good, with a great one handed feel. The antenna is not detachable and has an integrated design, making it very easy to play with.

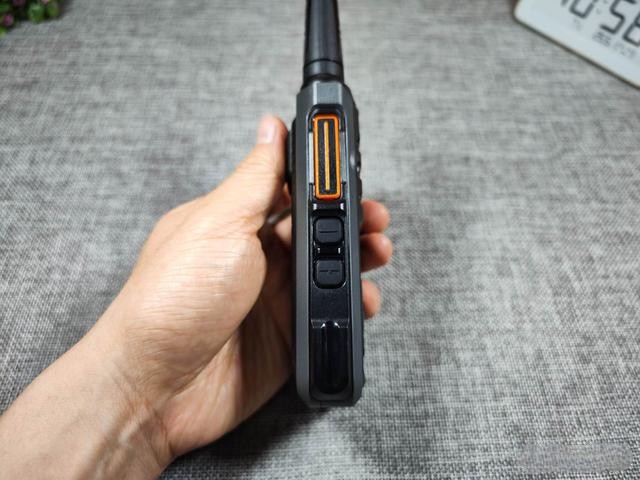
    The left side of the machine includes PTT emission buttons (Push To Talk), which increase and decrease the volume. The buttons have a crisp and sensitive feel, and the texture of large factory workmanship. There are also slots on the side, so it is not ruled out that there are seat charging accessories to choose from.

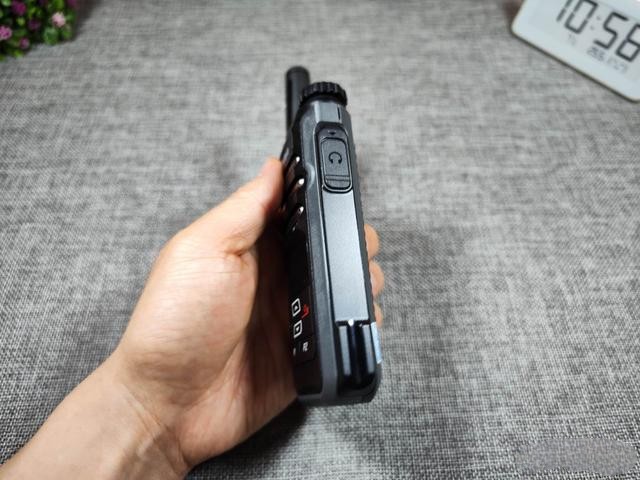
    On the right side of the machine is the interface of the earphone, which has a dust plug at the interface, which can provide waterproof and dustproof effects. However, unlike the TD370, which has an IP54 waterproof and dustproof level, Hytera G36 has not found a specific waterproof and dustproof level.

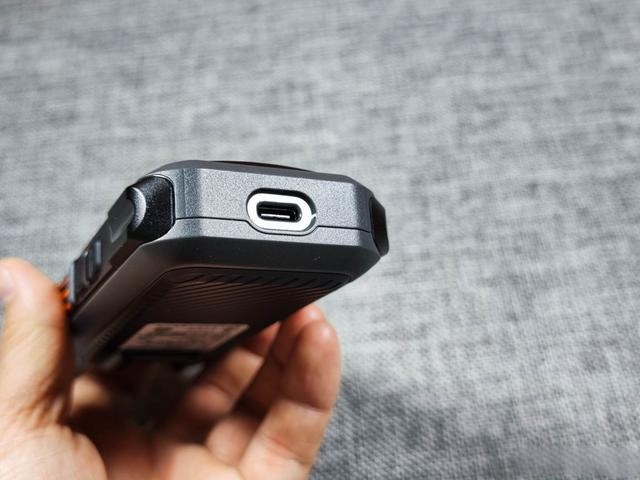
    The Type-C interface at the bottom can charge the walkie talkie or connect to the computer to perform frequency writing operations on the device and set the frequency parameters of the machine, which is very convenient. Moreover, Type-C data cables are now very popular, and ordinary mobile phone charging cables can charge the machine, making it more convenient for external use.

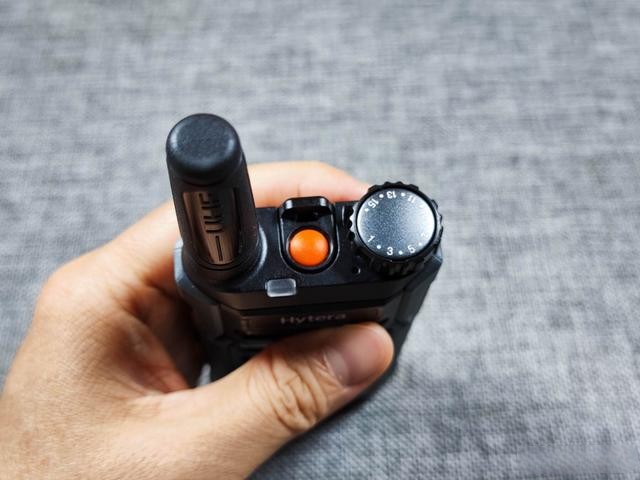
    The top of the machine has a channel knob and an orange TK button. The TK button can be customized through the intercom frequency writing software. In addition to the TK button, P1, P2, and volume up and down buttons can all be customized (volume up and down can only be customized by long pressing, because short pressing is volume up and down).

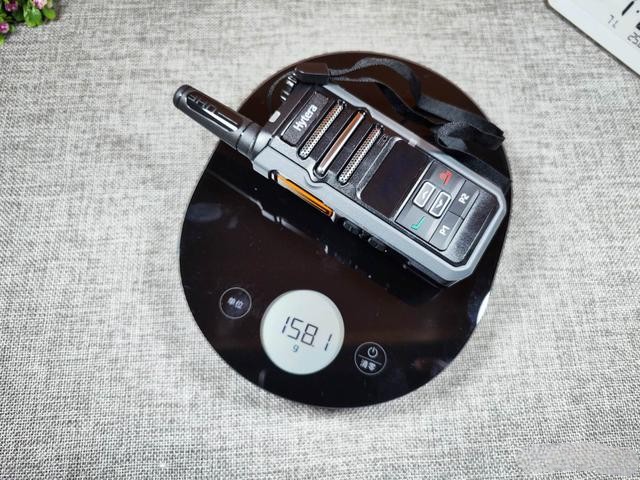
    The weight of the entire machine, combined with the back clip and lanyard, is only 158 grams. I believe that users who hold mobile phones weighing over 200 grams can understand how lightweight this weight is.

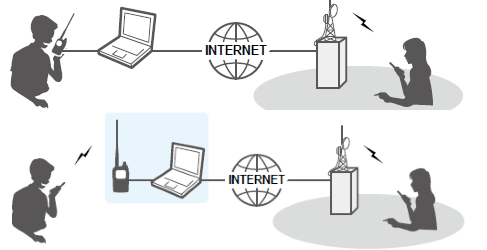
    In general, although the price of Hytera G36 is less than $100, its functions are no different from those of DMR digital analog integrated walkie talkie above $100. It can be seen as Hytera’s compensation for the digital analog integrated walkie talkie product line at this price. If you have a demand for DMR digital walkie talkie, have a DMR digital relay locally, or want to use digital walkie to connect MMDVM raspberry pie for global communication, Then this Hytera G36 is undoubtedly the first choice of the cost-effective DMR digital interphone product.

  • How To Program The Baofeng UV-5R

    How To Program The Baofeng UV-5R For Off-Roading, Hiking, Airsoft, Using The Keypad ?

    Programming the Baofeng UV-5R using the keypad can be a bit complex, but here are the general steps to program it for off-roading, hiking, airsoft, or similar activities:

    1. Familiarize yourself with frequency regulations: Before programming your Baofeng UV-5R, make sure you are aware of the frequency regulations in your region. Different frequencies and power levels may be allowed or restricted depending on your location.
    2. Gather frequency information: Determine the specific frequencies or channels you want to program into your UV-5R. You can find frequency lists online or consult local authorities or fellow enthusiasts for recommended frequencies for your activities.
    3. Enter frequency mode: Press the VFO/MR button to switch to Frequency Mode.
    4. Select the desired frequency band: Press the BAND button to select the frequency band (VHF or UHF) that corresponds to the frequencies you want to program.
    5. Enter the frequency: Use the keypad to enter the desired frequency, including the decimal point. For example, to enter 146.520 MHz, press the keys 1-4-6-.-5-2-0.
    6. Set the transmit power: Press the A/B button to switch between high and low power options. High power provides maximum range but consumes more battery.
    7. Set the frequency step: Press the MENU button, followed by 0, 1. This will allow you to set the frequency step. A frequency step of 5 kHz is commonly used.
    8. Save the frequency: Press the MENU button again, followed by 2, 7. This will save the entered frequency in one of the memory channels.
    9. Repeat for additional frequencies: Follow steps 3-8 to program other frequencies or channels you want to use.
    10. Recall programmed frequencies: To access the programmed frequencies, press the VFO/MR button to switch to Memory Mode. Use the up/down arrow keys or the channel number keys to select the desired frequency.

    Remember to comply with local regulations and obtain any necessary licenses for operating on specific frequencies. Additionally, always prioritize safety and respect the privacy of others when using your Baofeng UV-5R. It’s also recommended to refer to the user manual for your specific model, as the steps may vary slightly depending on the version and firmware of the UV-5R.

  • How to switch frequencies on Walkie Talkie ?

    The process of switching frequencies on a walkie-talkie can vary depending on the specific model and brand you are using. However, here are some general steps that may help you:

    1. Identify the frequency options: Most walkie-talkies have multiple channels or frequencies that you can choose from. Determine the available channels on your device and the corresponding frequencies they represent. You can usually find this information in the user manual or on the manufacturer’s website.
    2. Access the menu or settings: Look for a button or menu option on your walkie-talkie that allows you to access the settings or menu functions. This button is typically labeled as “Menu,” “Settings,” or “Mode.” Press the button to enter the settings mode.
    3. Navigate to the frequency settings: Once you are in the menu or settings mode, use the navigation buttons or dials on the walkie-talkie to scroll through the options. Look for the frequency or channel settings.
    4. Select the desired frequency or channel: Use the navigation buttons or dials to select the frequency or channel that you want to switch to. Some walkie-talkies have a dedicated up/down button or dial that allows you to cycle through the available frequencies.
    5. Save the settings: After selecting the desired frequency or channel, look for a “Save” or “Confirm” option in the menu. Press the corresponding button to save the new frequency setting.
    6. Test the new frequency: Once you have saved the new frequency setting, exit the menu or settings mode. Switch to the selected frequency and test the walkie-talkie by transmitting and receiving to ensure that it is functioning correctly.

    Please note that the exact steps may vary depending on the specific model and brand of your walkie-talkie. It’s always recommended to consult the user manual provided with your device for detailed instructions on how to switch frequencies or channels.

  • How To Connect Your AnyTone 878 to a Local Repeater

    To connect your AnyTone 878 handheld radio to a local repeater, you can follow these general steps:

    1. Obtain the necessary information: Contact the local repeater operator or consult online resources to gather the specific details for the repeater you want to connect to. You will need the repeater’s frequency, offset, and any required tones (CTCSS or DCS codes).
    2. Set the frequency and offset: On your AnyTone 878, navigate to the menu settings and locate the options to set the transmit and receive frequency. Input the repeater’s frequency, ensuring that you set the appropriate offset direction (positive or negative) based on the repeater’s specifications.
    3. Configure tones: If the repeater requires a CTCSS or DCS tone, you will need to set it in the menu settings. Find the tone options and input the required code for the repeater.
    4. Enable offset: In the menu settings, make sure that the offset function is enabled. This allows your radio to transmit on a different frequency than it receives, as required by repeaters.
    5. Save the settings: After adjusting the necessary settings, save the changes in the radio’s memory to retain the configuration.
    6. Perform a test transmission: Find a clear frequency on your radio and key the microphone. Confirm that your radio is transmitting and receiving properly by checking the signal strength and audio quality on the repeater’s output.
    7. Connect to the repeater: Once you have verified that your radio is functioning correctly, switch to the repeater’s frequency. Ensure that the appropriate offset is applied and that any required tones are set. Key the microphone and wait for acknowledgment from the repeater.
    8. Observe repeater etiquette: When using a repeater, it’s essential to follow proper etiquette. Allow sufficient time between transmissions, identify yourself as required, and adhere to any guidelines set by the repeater operator or local amateur radio community.

    Remember, the specific steps may vary slightly depending on the firmware version of your AnyTone 878 radio. Consult the user manual provided with your radio for detailed instructions and menu options specific to your device.

  • Conquest S23 vs Ulefone Armor 20WT

    When comparing the Ulefone Armor 20WT and the Conquest S23, it’s important to note that specific preferences and priorities may vary from person to person. However, here’s a general comparison between the two rugged smartphones:

    Design and Durability:

    • Both phones are designed to be rugged and durable, with military-grade certifications for water, dust, and shock resistance.
    • The Ulefone Armor 20WT features a slightly bulkier and more rugged design, with reinforced corners and an overall heavier build.
    • The Conquest S23 offers a sleeker design with a slimmer profile, making it more comfortable to hold and carry.

    Display:

    • The Ulefone Armor 20WT features a 6.9-inch IPS LCD display with a resolution of 1080 x 2400 pixels.
    • The Conquest S23 offers a 6.53-inch IPS LCD display with a resolution of 1080 x 2340 pixels.
    • Both phones have Corning Gorilla Glass protection for added durability.

    Performance:

    • The Ulefone Armor 20WT is powered by a MediaTek Helio P90 octa-core processor, paired with 8GB of RAM and 128GB of internal storage.
    • The Conquest S23 is equipped with a MediaTek Dimensity 700 octa-core processor, 8GB of RAM, and 128GB of internal storage.
    • In terms of performance, the Conquest S23 has a slight advantage with the Dimensity 700 chipset offering better overall performance and power efficiency.

    Camera:

    • The Ulefone Armor 20WT features a triple rear camera setup, including a 48MP primary camera, an 8MP ultra-wide-angle lens, and a 2MP depth sensor. The front camera is 8MP.
    • The Conquest S23 also has a triple rear camera setup with a 48MP primary camera, a 13MP ultra-wide-angle lens, and a 2MP depth sensor. The front camera is 8MP.
    • Both phones offer decent camera performance for outdoor and rugged use, but don’t expect flagship-level photography capabilities.

    Battery:

    • The Ulefone Armor 20WT packs a large 8000mAh battery, providing excellent battery life even under heavy usage.
    • The Conquest S23 comes with a slightly smaller 6000mAh battery, which should still offer solid battery performance.

    Software:

    • Both phones run on Android operating system, but specific versions and user interfaces may differ.

    Price:

    Ultimately, the choice between the Ulefone Armor 20WT and the Conquest S23 depends on your specific needs and preferences. If you prioritize a more rugged design and larger battery capacity, the Armor 20WT might be a better choice. However, if you prefer a sleeker design, better performance, and don’t mind a slightly smaller battery, the Conquest S23 could be a suitable option.

  • Two way Radio ID and application

    General units in the application of walkie talkies value instant response communication in walkie talkie communication. Pressing PTT to speak and receiving other walkie talkies with the same frequency within the signal coverage range of the transmitting walkie talkie achieve fast voice communication and meet efficient work needs. In the widespread application of walkie talkies in various industries, it is necessary to have high communication requirements targeting individuals and affiliated groups, reducing interference with other people and groups in the communication unit, and affecting work efficiency. This requires walkie talkies to have their own number and affiliated group number to achieve targeted communication needs.

    In fact, in the era of analog walkie talkies, various signaling methods (such as DTMF, 2TONE, 5TONE, etc.) can also be added to higher-level walkie talkies to meet the requirements of individual calls, group calls, and group calls between walkie talkies. However, the application in analog walkie talkies is relatively complex and the usage atmosphere is relatively low.

    Now that digital intercom applications have become mainstream in the market, do they all have the function of intercom ID? The answer is yes. Due to the scale sampling and coding application of digital technology, each digital walkie talkie is easier to configure with ID encoding function. In fact, each transmission includes its own ID code, which is easy for the receiving system to recognize, manage, and apply, providing basic conditions and guarantees for ID identification and digital cluster application of digital walkie talkies. This is also one of the advantages of digital walkie talkies.

    Digital Walkie Talkie ID

    The ID of a digital walkie talkie contains its own information in each transmission, so during the programming process, it is necessary to set the self ID and group information set in the application to which the walkie talkie belongs, so as to facilitate the display and management of relevant information on the receiving end. This is a problem that needs to be noted in digital walkie talkie programming. Before programming applications, we need to understand the specific application situation of the unit. Only by correctly setting the ID and group information can we achieve various subsequent management and applications.

    The above is the setting interface for the ICOM IC-F3108D/4108D digital walkie talkie from Japan. To achieve selective calling, setting the frequency alone is not feasible. It is necessary to set the Unit ID, individual calling, group calling list, mute form, and button settings for each machine to achieve the corresponding functions.

  • Best ICOM Shortwave Radio ?

    Which model of ICOM shortwave radio is the best to use ?This question is not very scientific, but it is often asked. In fact, it should be said that a radio station that meets the installation environment and performance requirements of users and has excellent cost-effectiveness is a good radio station. However, different models of radio stations may be more suitable for specific models of shortwave radio stations due to different usage environments and requirements. The suitable model is the best model.

    Communication performance of a device

    Short wave radio is a long-distance communication device that utilizes airborne ionospheric communication. Due to its relatively independent installation and long communication distance (over 200Km), it is more suitable for emergency communication and has been used today as a classic amplitude modulation communication method. The disadvantage is that the variation in thickness and density of the high-altitude ionosphere over time leads to unstable communication quality and uncertain usage frequency. It is more necessary to determine the working frequency, power, etc. based on the actual situation of local experiments, making this characteristic relatively high and unstable in actual communication, making it more suitable for emergency communication professionals and enthusiasts to conduct long-distance wireless communication.

    Common models of ICOM shortwave radio stations

    Marine shortwave radio stations have significantly improved waterproof performance compared to land radio stations, with operating frequencies generally set internationally, while amateur radio stations have an advantage in multifunctional and large screen displays. Users can flexibly choose the best cost-effective product based on their specific usage environment, performance (such as power size, frequency stability, ALE, paging and ACC output parameters), and display requirements. The following IC-F8101 and IC-F718 are more professional applications, IC-7000 is more amateur, and IC-7800 is high-end indoor applications.

    Common models of ICOM shortwave radio stations include professional shortwave radio stations IC-F8101, IC-F718, and IC-F7800; Amateur multifunctional IC-7000, IC-7300, IC-F7000, and marine shortwave radio IC-M710, IC-M710RT, IC-M801E, etc. They have the same external appearance except for the working frequency band and power, and their specific parameters are related to each other. You can choose a suitable shortwave communication product according to your actual needs.

  • Short wave Radio VFO A/ B

    Introduction to shortwave communication

    Short wave radio is a communication device operating at frequencies below 30MHz, which relies on ground waves and airborne ionospheric reflection to propagate communication signals, achieving long-distance short wave communication across regions and oceans. Short wave equipment is relatively simple and easy to install, but due to its low operating frequency, large antenna volume, and unstable ionospheric reflection in the air, it causes significant communication fading, instability, and unstable frequency selection, making it a traditional long-distance communication method. The following figure shows examples of common Japanese ICOM shortwave radio stations such as IC-F8101 integrated receiver and related shortwave radio stations.

    VFO operating mode of shortwave radio station

    VFO working mode is a working mode that many professional and amateur radio stations have. Its working frequency communication panel knob or button can be set at any time, making frequency setting convenient.

    Careful friends will find that in VFO mode, there are generally two frequency memories available for selection: VFO A and VFO B. For example, the professional radio station IC-F8101 of ICOM in Japan has two memories: VFO A and VFO B. After entering VFO mode, pressing the function key A/B can switch between VFO A and VFO B, as shown in the following figure.

    The default VFO working mode in the above figure is VFO A working frequency. Pressing the A/B multifunction key can switch between A and B keys. The figure on the right shows that when the receiving and transmitting frequencies are different, the receiving frequency of VFO A is 14.100MHz; The transmission frequency is stored in VFO B and the frequency is 14.105MHz.

    The role of VFO A and VFO B

    Obviously, when the transmission and reception frequencies are the same, both VFO A and VFO B frequencies can be selected for operation. But what should I do when the frequency of sending and receiving work is inconsistent? At this point, VFO B plays a role in storing the transmission frequency, and a single VFOA or VFO B cannot be achieved. This is the common SPLIT working mode of VFO.

    That is to say, VFO A and VFO B provide a solution for transmitting and receiving different frequencies through relay stations.

  • ICOM ID-52E Highlights Advantages

    Functional advantages

    ICOM ID-52E is a fully functional new generation amateur handheld walkie talkie launched by ICOM in Japan, which not only has dual band main and secondary displays; Built in GPS to display the current position; Insert card recording; Bluetooth; Equipped with data transmission and USB charging interface, for the first time, the handheld platform has integrated a water ripple waterfall signal display function, which vividly displays the signal strength over time within the band.

    By utilizing the D-STAR amateur relay system, digital individual calls, group calls, and group calls within the system can be achieved, achieving global amateur QSO connectivity.

    Main features

    The ICOM ID-52E has a D-STAR repeater (DR) function. The terminal mode and access mode can be used to achieve cross regional global enthusiast connectivity under the D-STAR system.

    Major function

    The dual display screen function can simultaneously receive and record two different bands or modes.

    Built in GPS receiver for checking your current position.

    The recorder records your QSO conversation, TX voice audio, and microphone voice audio.

    Micro SD card slot, which can accept different cards for backup settings, various memory channels, GPS logs, etc.

    USB connector for data transmission or battery charging.

    Bluetooth function that can connect Bluetooth devices, such as VS-3.

    The waterfall plot display of the band oscilloscope function is used to display the signal strength that changes over time.

    Comparative advantage

    Compared with ICOM ID-52E, it adopts a 2.3 inch color display screen (51E 1.7 inch); Added water ripple signal strength display function for the first time; Adapting to the development of the times, Bluetooth has been added to connect voice devices and data terminal devices; In DV digital mode, image display and mutual transmission functions can be achieved, which is more in line with the trend and fashion.

  • What are the main components and accessories of walkie talkies?

    The main components of a general walkie talkie include the host, battery, antenna, back clip, charger, and adapter, and some are also equipped with a hand rope. Introduction to some main functions for better use of intercom communication equipment by users.

    Housing Shell: Professional machines generally use high-performance plastic material PC+ABS, which has a good appearance and luster, is not easy to age or wear, and the product is sturdy and durable; Commercial aircraft often use engineering plastic ABS, which can meet the requirements in terms of appearance, strength, wear resistance, aging, and other aspects well; The buttons are made of silicone, which is wear-resistant, not prone to aging, and has a good touch; The aluminum shell is made of lightweight material aluminum alloy ADC12, which is easy to form and undergo subsequent processing.

    The main accessories and composition of the walkie talkie host include a cover, PTT button, earphone and power plug, PCB component, LCD part, volume/switch button, coding knob, indicator light, MIC, etc. The PTT button acts as a transmission switch, usually on the side. The indicator light indicates the working status, usually at the top. At the top of the walkie talkie, there are also volume/switch buttons and encoding knobs (to select channels). The LCD section visually displays the working status of the walkie talkie. The PCB component is the core part of the walkie talkie, and important components are all on the PCB. Non professionals are not allowed to disassemble it. Most walkie talkies also have specialized shielding covers, aluminum shells (fixed PCBs), etc. due to their technical performance and drop resistance requirements. Professional machines also require waterproofing and have a more complex structure.

    Battery: The battery is divided into Ni Cd, Ni MH, and Li ion batteries, with capacities ranging from 600mAh, 800mAh, 1100mAh, 1500mAh, and 2200mAh. Lithium batteries are relatively expensive and have entered the main application stage. Ni Cd and Ni MH batteries are commonly used, and Ni MH batteries are generally recommended for high capacity batteries. The battery surface and bottom shell are firmly and reliably welded by ultrasonic welding.

    Belt Clip: The function is to fix the walkie talkie on the belt, and for the convenience of customers, the belt clamp can be disassembled.

    Antenna: divided into two parts: antenna jacket and antenna core. The antenna jacket is made of high-performance TPU material, which has excellent bending resistance and aging resistance; The antenna core is generally connected to the host using a threaded structure, making it easy to disassemble.

    Charger: Shared with the Taurus to charge the battery or the entire machine. The structure generally includes DC sockets, charging shrapnel, indicator lights, buttons, etc. The DC socket is connected to the fire cow, the spring piece is connected to the battery pole piece, the indicator light indicates the charging status, and the button is used for discharging. Seat charging can generally charge the battery and the entire machine.

    In addition, there are also accessories such as leather cases and headphones for customers to choose from.